A while back on the Ableton forums someone was asking if it might be possible to emulate the DJM-2000 style 'Frequency Mixing' function by building a custom effect rack. I thought I'd have a go at it and I think it turned out pretty good.
You can see a video of the "Frequency Mixing' feature in action on the DJM-2000 in this Youtube clip.
Basically, the feature gives you an independent cross-fader for each of 7 individual frequency bands - pretty nifty! I chose to use 8 bands, not sure why. You could modify the racks to have less bands if you desire.
** Note: the sections in italics may be skipped if just want to get the devices working and are not interested in in ins-and-outs of how they work.
Firstly I tried using using a series of EQ8 lowpass and highpass filters to slice out the frequency bands: this was a little messy, provided reasonable frequency isolation and low CPU usage. The signal was slightly colored passing through the filterers but there were no noticeable comb-filter like artifacts.
I then tried using a similar setup of EQ8 filters, however this time using complex chains with nested phase cancellation all the way through to attempt to create a 100% transparent device, or at least get as close to digital silence as possible when doing a phase-inversion test. This was far more complicated than I thought it would be, and by the time I was nearing completion I realized that the CPU hit of having such a complex chain of EQ8s was not worth the extra transparency - I scraped it. I guess club audiences are used to less-than-transparent filters and equalizers anyway? The club standard DJM series is certainly far from transparent. Perhaps transparency is not a massive issue so long as there are no ugly noises or loss in bass.
Lastly, I tried a version using phase-inverted notch filters instead of low and highpass filters, in an attempt to get a tighter cut. To my surprise these provided less frequency isolation that the latter.
In the end, low and high-pass filters with a 'Q' of about 0.71 provided the best balance of transparency, band isolation and CPU efficiency. However, I should point out that the device is still a fair CPU hog, but more on how to minimize that later.
Requirements
To run this you will need Ableton Live 8.1.2 or above, eight spare midi CC encoders, and one slider for the cross-fader. You may also need an extra button if you wish to be able to quickly turn the feature off and on to revert back to your regular full-band cross fading (see Optional Extras).
For a basic two channel DJ-style setup, you will need a device on either channel assigned to cross-fade sides A and B respectively. If you are using this in a more complicated multi-channel DJ set up, or a live PA style project, then I advise you to create two A and B buss channels to route your audio into, and then place the racks on those - otherwise you will need one of these racks on each and every cross-fader assigned channel, which is not particularly CPU efficient and will take longer to set up. For the purpose of this tutorial I will just use an example where you have only two cross-fader channels.
Instructions
1. Extract the *.adg files (which are Ableton racks, for those who are not familiar), and drag them directly into the 'Audio Effect Rack' folder on your Ableton device window.
 2. Assign your cross-fader channels as A and B as you would normally.
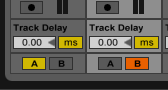
3. Drag the racks '8-Band A' and '8-Band B' onto the corresponding cross-fader assigned channels. The racks should look as follows:

4. Assign the midi encoder or slider you would like to use as your cross-fader to the white macro controls called 'X-fade control A' and 'X-fade control B' on either rack. Then, go to your midi mapping window, right click on the entry for 'X-fade control A', and select 'invert range'.
These knobs control the balance between the wet and dry signal within each rack: this is needed to make sure the signal reaches full and even gain for each frequency band by the time the fader hits either extreme. Effectively, as the fader approaches the center, the contribution to the signal of the eight-band frequency mixing is increased. At dead center the mix is controlled entirely by the eight-band settings.
 5. Pick eight encoders or faders that you would like to use for frequency mixing, and assign them to the respective colored macros on either rack Be sure to be consistent with your controller assignments across both devices! In the example to the right I have used midi CCs 16 to 23 on channel 1. Yours will most likley be different.
 You do not need to invert the values for the midi mapping for any of these knobs, as this is built into the macro mapping within the rack itself. The frequency bands I have used are as follows:
>8 kHz | 8-4.1 kHz | 4.1-1.9 kHz | 1.9-890 Hz | 890-400 Hz | 400-180 hz | 180-80 hz | <80 Hz
6. Now you need to assign your cross-fader to two device on/off buttons within each rack. They are circled in red in the image bellow:

You will need to modify the min and max settings in the midi-mapping window for these device buttons as follows:

Assigning your cross-fader to these buttons in this fashion means that when the cross-fader is at either full-left or full-right position, either one of the two embedded racks will be disabled. This will save your CPU by only engaging the array of EQ8 filters only when they are receiving audio.
You are now ready to to use the 8-band cross-fader!
How to use it
While your main cross-fader is in the middle of it's range, the eight band frequency faders are active. When all your eight frequency band controls are set to their middle values the cross-fader will behave like a regular cross-fader. Turning them to 0 will result in 100% track A and 0% track B signals for that frequency band. Turning them to 128 will result in 0% track A and 100% track B. The main cross-fader control will always play 100% of track A or B at either extreme, regardless of the current state of the eight frequency bands - it over rides them. As you move the main cross-fader from the center position towards either side, the eight band signal is progressively mixed with an untouched dry signal of that track.
The following diagrams (which show of my exemplary MS paint skills) may make the function more clear. The blue and red bars represent the gain for each of the 8 frequency bands on either track.

The frequency band knobs have no effect when x-fader is at either left or right extreme.

Both cross-fader and all frequency knobs are centered. The cross-fader behaves like a regular x-fader.
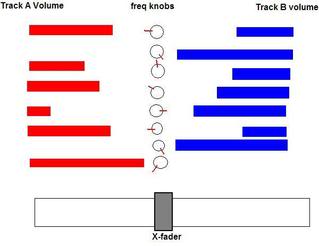
While the cross-fader is centered the 8 filter knobs can be used like individual cross-faders.

As the cross-fader is moved from the center to the right the eight frequency bands are mixed with the dry signal of the track; their effect becomes less pronounced.

All frequency bands have been moved to 100% on the left while cross-fader is centered; essentially same result as if the cross-fader where 100% to the left.
Optional Extras
On/off button:
You may find that sometimes you wish to just use the normal cross-fader without worrying about the effects of the eight frequency knob settings. In this case you can use a midi button (or encoder, I guess) to switch off both racks. This is why I have enclosed the two racks used so far in an extra seemingly redundant rack - to give you another avenue to switch off the devices. Simply assign the device on-off buttons for the outer racks to the button of your choice, and make sure that they are in sync.
Buttons for automation:
If you like you can create some buttons to automatically move the knobs to a given position, for example; one button to center all eight bands; individual buttons for centering individual bands; kill buttons, to cut bands hard left or hard right. This requires you to create some dedicated midi clips to send data out via a virtual midi cable (IAC drivers for MAC, Midi Yoke for PC) and then back in again as remote control. Go here to see Tom Cosm give an explanation on how to use virtual midi cables to launch remote-control events from midi clips in live; it's just a matter of applying the same principals to the CC numbers you're using to control the devices here.
Known Problem
Due to the limitations in Live's macro control programming capabilities, I was unable to iron out one of the gain transitions. The problem occurs when you have moved all your frequency bands to one side (as in the last diagram), and you then move the master cross-fader over to that co-responding side (as in the first diagram). If you can figure out a way to rig a utility device or something to fix it please let me know, but I couldn't! It should not be a problem, however, as there is no reason to slowly fade between those two states anyway; they both give the same output. It's just a case of remembering to jam the fader across quickly if in that situation.
Here is a video demo of this racks function using a basic two-channel dj style setup. You can only just see the master cross-fader down the bottom, sorry about that. You also can't really hear the two highest bands due to the quality of the streaming video.
The two tracks being blended are 'Black Truffles In The Snow' by Loco Dice, and 'Vantage Island (echospace spatial dub)' by Deepchord. You'll notice the bands don't cut too sharp, but give a nice blended feel; you can really melt the signals together nicely without chewing up headroom or creating nasty resonance peaks.
There are other uses for this device besides DJ'ing. For instance, say you have a live PA setup where you find yourself suddenly jamming on two synths with big wide pad sounds that take up huge chunks of your frequency spectrum; you wont have time to sit down and prepare some proper parametric EQs to make sure they blend together well, so instead just use the complementary 8-band cross-fading channels to give them a rough-and-dirty mix. You could also use them in sound design for a similar purpose, if you're in a hurry to get two broad-spectrum audio channels to share some headroom.
So, that was my first real proper blog effort. Was it alright bluds?
flippo
Dude! Glad you started this blog, I think many people could benefit from your expertise! Keep the posts coming!
ReplyDeletethanks Eli. Just paying it forward really, I've enjoyed getting many ideas from blogs and tutes myself.
ReplyDelete